Friday, 21 June 2013

A Goating update because I have not done one for a looooong time.

We have had a great time in Sneaky shark having sailed it around Portsmouth and Chichester harbours in 2012 but she has been stuck in the garage all winter.   Finally she has hit the water in 2013 and I have been out in her twice this week after work.

In terms of mods I have no added a single toe-strap that runs from the middle seat to the aft seat and this really helps me to get weight out on the rail.   We are still working on the best position for the crew but in stronger wind I think the crew may be able to get one foot under the strap but if it’s that windy we would probably go for a reefed sail.

Getting Sneaky to and from the water was getting to be a bit of a pain so I’m now keeping it at a sailing club in Portsmouth harbour, this makes life much easier and I’m now taking part in their summer evening racing series.   It’s a bit of a learning curve as not only do we need to work out a handicap with the club but I’m also having to get used to handling the boat with a bunch of other dinghies around.  It’s all great fun and my good friend Dan is keen to sail with me and really knows what he’s doing.  We are racing initially with a handicap of 1145 which in theory makes us the fastest boat in the “slow” fleet, it sounds like a reasonable starting point and we will just have to see how we get on in comparison to the other boats.

We had a practice last night with Dan, perfect summer evening, warm with a gentle 6-8k kts breeze. Well worth doing as we played with the sail controls and in the light airs found that we really needed to play with the downhaul much more than previously, it has a huge effect! We also released some of the tension in the yard, I was pulling the top corners out too much but this may need to be re-tensioned in stronger winds. Dan also showed me how we can steer the boat by heeling it, helps with tacking as the rudder is used less so less loss of speed.  The boom is too heavy really, it’s not a problem in stronger winds but in light winds it pulls the leech down and creates a crease from the front of the yard to the rear of the boom that can be removed with more downhaul but that then flattens the sail too much.  I have always known the boom was over-weight so it’s not a surprise, I’m going to remove some more material from the boom, perhaps drill a bunch of holes in it J.

That’s all for now folks, sorry no pics this time, I’ll try and get some of us racing.

Thursday, 23 August 2012

More time on the water

Having spent 4 days sailing Sneaky around Chichester Harbour I was able to play with my new reefing arrangement, downhaul position and the boom retainer (not sure what else to call it but the rope that holds the boom loosely against the mast). I was mostly sailing with the kids but got some time on my own in winds that ranged from nothing to F4 or so.

The new reefing arrangement – This worked really well and it is much easier to get a reef in than it was before although I would still drop the sail to do it. The stainless carbine/snap hook for the tack (
http://www.wichard.com/fiche-A%7CWICHARD%7C2315-0202040500000000-IM.html) made it really easy to attach the reef tacks alongside the standard tack. There is also a Wichard Delta hook that may be even easier to use but it wasn’t available in the shop local to me. The reefing lines at the back end of the boom also worked really well, pull on the rope and jam in the valley cleat – dead easy. The only downside was the rope dangling down because I was too lazy to coil it also I only added a single valley cleat for both reefing lines so I need to add another.

I changed the “boom retainer” to the arrangement suggested by another member on the Storer forum, the rope goes from the front of the boom, around the starboard side of the mast and then tied to the boom that is on the port side of the mast. I found this worked best with a thicker rope as thin stuff would bind, I ended up using the outer polyester layer of a 12mm braid on braid rope I had laying around. This allowed the sail to hoisted easily, and stopped my normal problem of the boom sliding forward and getting caught under the breasthook.

In combination with the new boom retainer I tried moving the downhaul aft and initially had it about 8” behind the mast, this worked ok but I found that it really added little to the sail shape but did cause the boom retainer to bind when sailing downwind. I ended up having the downhaul about 3” aft of the mast and that worked well.

This would probably mean more if I had pics but I forgot to take some. I’ll try to take some pics next time I rig it up, maybe this weekend coming if the strong winds blow though in time.

Lots of comments and interest from the folks I was sailing with (it was a Dinghy Cruising Association (Home - Dinghy Cruising Association) and UK Home Build Boat Rally (UK HBBR) event) about the GIS as they had never seen one in the flesh although one member of the group admitted having a GIS as the background image on her computer “because it is such a beautiful lug rig”. If that’s not praise for Mik’s hand then I don’t know what it. I also managed to collect a few scratches but it’s there to be used so I can live with that as we were having such a good time.

Tuesday, 7 August 2012

The English Raid 2012

The original plan was that I would get some time on Sneaky Shark with Annie before the Raid but the British weather, work and family commitments made that impossible.  We trailed the boat to the east coast having only sailed it once myself and Annie met Sneaky (as she has been shortened to) for the first time the previous evening.

Wednesday was really the set up day, after four hours in the car we launched at Woolverstone and had a very pleasant sail down the river Orwell to Shotley, this is approximately 6nm.   There were plenty of other raiders also launching and it was great to see such a mix of boats on the water.  The wind was around a Force 2-3 and the water flat so we used full sail and enjoyed the sun.  Having always sailed Bermudian rigged keel-boats this was a very different way to sail and we got used to the boat, how she handles in gusts and on various points of sail .   Once through the lock and in Shotley marina we had little spare time as the car needed to be collected so we can pitch our tent and join the rest of the raiders for a welcome dinner in the Shipwreck pub.

View from Shipwreck bar

Relaxed skipper leaving Woolverstone


After breakfast on Thursday we had a briefing for the day’s activities and a little time to sort the boats before locking out of the marina, fortunately the lock would take 8 or more raid boats at a time so there wasn’t too much delay in getting out on to the river.   We sailed with a reef as the wind was forecast to be low teens but gusting up more later in the day, in retrospect this was the correct decision as we were on a steep learning curve.   We spent the morning beating to windward up the Stour to Manningtree, it’s about 9 miles as the crow flies and while we made good progress I was struggling at times to get Sneaky going to windward, it was very gusty and I was constantly trying to point too high.  It was about half way up the river I realised that I needed to bear-away and ease the sail in gusts rather than feather up to windward (as I do in my sailing cruiser).   We very nearly capsized on a few occasions and managed to half fill the boat with water once.   When we arrived lunch was enjoyed on the beach with the raiders that made it, some didn’t.

Sneaky on the beach at Manningtree

Sneaky at rest waiting for the next day


It was a race back from Maningtree to the Ganges Buoy near Shotley in the afternoon and the breeze was picking up to the late teens and gusting more I would guess.   We had a very fast and exhilarating sail with the wind either on the beam or the starboard quarter and sailed the course (around 9nm) in 63minutes – it felt very fast and we were very pleased to be first to the finishing mark although were 12th on handicap.  Dinner was in Harwich so we all rafted up inside the harbourmasters pontoon and had a wander around an old lightship before finding Harwich and Dovercourt SC for fish and chips.  For the short sail home we put the second reef in and was pleasantly surprised at the speed of Sneaky as we overtook boats under engine on their way back to Shotley.  In total I estimate we sailed around 20nm but I imagine in terms of water under the boat it was a lot more with all the tacking in the morning.

Raid boats rafted at Harwich

Raid boats rafted at Harwich


The forecast for Friday was more wind so the plan to leave the harbour and head for the Walton Backwaters was abandoned in favour of an easy sail to Suffolk Yacht Harbour for lunch and then a race in the afternoon.  We had a good practice sail in the morning with one reef in and seemed to have Sneaky going better to windward with more downhaul on and I was sailing slightly more off the wind than the previous day.  The wind picked up a little over lunch and I thought we could stay with one reef but once out on the water we were struggling to control the boat and keep ourselves upright but also enjoyed the acceleration and speed that Sneaky would provide when powered up.  We picked up a mooring buoy and put the second reef in for self-preservation but this did mean we missed the start of the race by about 8 minutes so were well behind.  We started chasing the back markers but ended up just enjoying the sail and improving our skills in the strong winds that some estimated as F4-5.  With the wind over tide and it being a spring-tide the water became quite rough where the two rivers meet and we did our best to stay in the shallower water that seemed smoother although the sharp bow would cut through the waves and I got better quickly at “cork-screwing” over the waves which seemed faster and more comfortable.  Safely back in the lock it seemed that everyone was having a fun but hard day on the water.  Dinner was in the Shipwreck again and we all tucked into a really good curry.  Total miles sailed on Friday would be around 18miles.

View from Harwich up the Stour at low tide


Saturday was the last day of the raid and a course was set to race us up the Orwell with a leg back on ourselves for some variety before finishing south of the huge road bridge.  This time we would be ready for the race and while we sailed out with a reef this was shaken out by the start so we could race under full sail.   We had a pretty good start with a Force 2-3 south-westerly and some stronger gusts and found ourselves third on the water with larger (and I thought faster) boats behind us.   Annie and I worked hard to put into practice all we had learnt about sailing Sneaky the previous days and managed to keep a gap between us and the pack of boats behind but were unable to catch Kite and Molly but they were both much larger and faster boats.  Lunch was at the Orwell YC and Annie sailed us a quite a way back down the river to Woolverstone where Sneaky was put back on the trailer and towed back to the camp site.   Total miles sailed for Saturday would be around 14nm.  The evening dinner and prize giving was at Pin Mill, a club that must have one of the best views in the area and we watch the tide retreat and the sun go down while enjoying the company of the raiders.

Start of the Saturday race

Just after the start about to overtake the boat to leeward.


All in all it was a fantastic few days of sailing in an area I have never visited before but one I would like to explore again another time.   Sneaky was everything I could have wished for on the water and more, east to handle, rewarding to sail and quick as hell when you get her going.   I came off the water each day with a smile of my face and looking forward to taking her out again the next morning.  Many people were impressed with the GIS design, one chap in particular was very impressed and as an ex-racing yacht designer he knows a thing or two I guess.  There were rumours that next year there may be a raid in the south-west and if we can Sneaky will be there to enjoy it.

Team Sneaky shirts at Pin Mill

Team Sneaky at Orwell SC

Next up for Sneaky Shark will be a few days camping and sailing around Chichester harbour with the Dinghy Cruising Association.   But first I need to fix the top aft corner of the daggerboard that I have split from putting it in the car carelessly – really annoyed with myself for not being more careful but some epoxy in the crack and glass over will patch it up.  In terms of mods I really need to fit some hiking/toe straps, a single one in the middle will be more than enough I think, also there is some play between the rudder and it’s housing so I will glue some thin rubber to the top of the rudder blade to pack this out.

Wednesday, 27 June 2012

Sails like a witch!

After a bit more fiddling and fettling we finally had Sneaky Shark sailing at the end of May and she goes like a dream.

We sailed in reasonably light winds with both full sail and one reef in (just to try it out).   I need to play with the reefing arrangement to make it easier but it all worked just fine.  It was very interesting to watch the rig flex and absorb/spill gusts as they hit and I’m starting to understand why some people really rave about the simplicity and performance of a well set up balanced lug rig.

There is a little bit of play between the rudder blade and the cassette that isn’t really a problem but would be annoying on a long sail so I will try and fix that with some thin rubber or foam glued to the top of the rudder blade.  I’m also going to get the sail modified a little so that battens are held in with Velcro (or similar) rather than sewn in as they are now with a stich at the end of the pocket.

Annoyingly my hectic schedule has not allowed any more time sailing the goat since this first sail but I have now signed up to take part in Raid England that is 5 days of sailing on the East coast.   I can’t wait!   With some luck I can also get some after work sails in although the British summer has been particularly poor this year, perhaps we are due a change for the better.

Thursday, 17 May 2012

It floats!

Well the big news with this update is that it floats but more on that in a bit.

Since the last update I have varnished the yard and added a leather sleeve to offer a little protection as it rubs against the mast, I have also made the boom.   While I played with the idea of making a hollow box boom I eventually made a solid boom from doug-fir, it is a little larger than the plans but I don’t want a bendy boom with a loose footed sail.   To reduce the weight I have removed some material along the centre of the sides to make it a little like an I beam and also rounded over all the edges with the router.  The boom has also had some leather added where is will rub against the mast.   The boom is still rather heavy so I will see how it goes, perhaps I will remove some more material from it or I have now found a source of Carbon-Fibre tubes that could work.

I have had the sail delivered and the chaps at Sanders have done a great job although I’m still try to work out how to fold it when attached to the yard.   The sail has three short battens up the leech and two reef points and I can’t wait to try it out.  The battens loo like they are sewn in with a little stich at the end so I may have to make the top one removable to help with rolling up and storage.


All the blocks, saddles and other deck gear have been added to the boat and spars and I have ended up with a 4:1 purchase on the downhaul.   I was planning to use a cascade on this to make it an 8:1 but I was struggling to make it work satisfactorily so that the boom had the range of height I wanted.  Both the downhaul and the halyard go through holes near the mast, through turning blocks at the mast base and onto cam-cleats, this arrangement keeps all the control lines in the bottom of the boat but I can adjust them from anywhere.  Lastly I have screwed and glued the waterproof hatches so that should keep the boat floating when I have embarrassed myself and the boat is capsized.
To help launch the boat I have made what I think it called a dinghy dolly, with this strapped under the boat I can manoeuvre her on and off the road trailer with relative ease and get the boat into the water.  It’s not perfect as I have to get wet feet to retrieve the dolly after launching and on recovery but I can cope with that as It’s cheaper and lighter than a proper launching trolley. 

So finally to the weekend, on Sunday the goat was trailed down to Gosport where I keep my other boat and after a little wait for the tide to come up enough my wife and I carefully slid “Sneaky Shark” into Portsmouth Harbour, the kids hopped in and we have a little row around before having some lunch.   I did not take the sailing rig with us as the bolts for the cam-cleats hadn’t turned up in time but this was really just a test before the proper launch and official naming.   She rowed well and also motored along very nicely with a 3.5hp outboard on the stern.  With no one in the boat but myself the wind would blow the goat around a bit, and when under engine a fair amount of water would splash up the daggerboard case so I am making a small rowing/motoring skeg that will cap the daggerboard case and offer some lateral resistance to the wind.  After a fun few hours she was packed up and trailed home.   The forward and aft tanks were both completely dry but I did has a little water in the non-standard middle tank.   I think I may have left the hatches a little loose and some water got in when I was motoring but I’ll soon find out next time she is afloat.


That’s all for now folks, I need to make a cap for the daggerboard slot and do a few other jobs but she is basically finished.  The next few weekend are all busy but I hope to have her out sailing in early June.

Tuesday, 24 April 2012

Painted and almost ready for the water

This is turning into a monthly updated blog rather than a step by step review of progress.  What can I say apart from it’s not my top priority and I would rather be building in the garage than tapping on the keyboard.  Well, enough of excuses, this is what I have been up to.

After a rubdown of the HB primer I then added a coat of white perfection undercoat that was also then flatted down before the bottom of the hull was painted red.   The first coat of gloss picked up quite a few specks of dust and dirt so the garage was given (another) clean, the hull wet sanded with 500 grit and a second coat added.  This time I dampened the floor of the garage with a hose so that I didn’t kick up any dust as I was moving around the boat and this helped a lot.   Next the sides of the hull were given two coats of the platinum grey (off white), again there was a light wet-sand between coats.

For all the painting I have used the roll and tip method using a gloss foam roller and a foam jenny-brush and this worked well.  I am really impressed by the International perfection paint, it covers well and once left alone settles to a flat gloss finish.   I have managed to paint with no runs and it is only the few dust speckles that detract from the finish.  Once cured Perfection is a very hard surface that should resist scratches well.   With the paint cured the aluminium capping for the skid rails was added and the hull flipped over so that a single and final coat of epoxy can be applied to the inside.   The inside now has a total of three coats all over and just needs varnish for UV protection.

On the spars I have done some further work to move them along a bit.   The hollow mast looked ok  with it’s natural finish but I became taken with painting it black similar to a black-masted boat my parents had when I was a youngster.  After applying the same Jotun HB primer as I used on the hull and a rub down the mast had its first coat of Jet-black Perfection, rather than using roll and tip I just used a foam brush but I did end up with a couple of runs so this has now been wet sanded and will get another coat on this week.  I’m planning to add some leather to the yard and boom to protect the mast.

The initial yard that I made was very flexible so I have had another crack at this and have ended up with the desired flex of around 45-50mm with 10KG hanging from it.  The yard is a smidge bigger than the sizes given in the plans but it is easier to take some more off later than to add it back on.  Having made the yard I have now been able to provide the flex data to my sail maker who will have the sail ready in a couple of weeks.

I have had to start thinking about the rigging, blocks and control lines and having looked at what is available I am going to go with all Selden blocks, they are a similar price to the Harken/Ronstan equivalent but they are really nicely made also look cool.  I could go cheaper but I think it’s worth it.   The downhaul is going to be a 6:1 purchase as a number of folk have said that this makes the sail control easier, the downhaul will have a 3:1 system attached to a single cascade to double the power.  Both the halyard and downhaul will come down to cam-cleats at the mast foot so that they can be managed from the middle of the boat.

Finally the aluminium SeaSure rudder fittings have been added to the rudder box and transom.   The hole in the transom does not allow the use of normal pintles as there is not enough room to lift the rudder assembly up so the arrangement we are using is to have both fittings with a 8mm hole and a stainless bar or bolt will be used to hold it all in position.

I think that is all for this update but here is a pic of the boat, on its trailer, mast up.   Looking good I think.


Tuesday, 20 March 2012

The mast fits, phew!

Wow, it has been a month since I updated the site.   Sorry about that but I have had to do some decorating in the house but that doesn’t mean the goat has been forgotten about and she is coming along nicely.


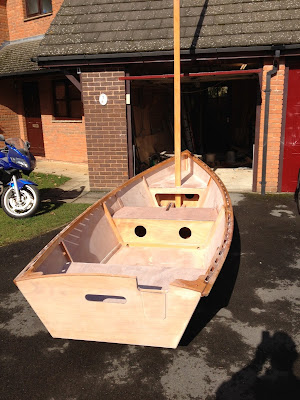
First up she was lifted out of the garage and the mast fitted for the first time, fortunately it is a slightly loose fit so once it has a final finish it should be a nice snug fit.  Here is a pic of the goat in the driveway, she suddenly looked big next to the car and the mast is tall when upright but it’s all about context and she will feel a bit smaller again on the water.  You can also see that the central seat/tank top is now in position and most of the inside has had a final sand (using my new RO sander) before it gets a final coat of epoxy all over.


With the GIS back inside and upside down the hull was given a wash down to get rid of any amine blush and then sanded all over.   The edges of the glass tape particularly needed a good sanding to bring them down flat.  Next the underside of the outer gunwale needed to be planed flat, the oak capping needs to be trimmed down to the level of the doug-fir.  The hull was then given a final coat of epoxy all over before the protective hull runners were fitted.   Rather than just having two long runners I have added a third up at the bow to add some protection to an area I think will be vulnerable when landing the boat on a slipway or beach.  Also I am not using a heavy hardwood for the runner but have instead used some Doug-fir that will then have an Aluminium flat bar screwed on.  So that the screws don’t allow water into the runners I have drilled large holes for the fixing and filled with thickened epoxy, the screws can then be fixed into epoxy rather than wood.


Lastly the hull was given one more light sand and was feeling pretty flat with just the odd mark in the ply that will need filling.   The hull has been given two coats of a high-build epoxy primer from Jotun, it went on well and after a few days curing it is a really hard finish.   The primer will need a light sanding to flat down the surface and a bit of faring filler then will be ready for undercoat.  For undercoat and topcoat I am going for Perfection from International (Interlux), a two part polyurethane that should be very resistant to scratches in use.  It is a lot more expensive but hopefully worth it.


Below is a pic of the bow runner, primed a pleasant shade of battleship grey and the alu runner is placed on top.


Tuesday, 14 February 2012

Epoxy update #2

Having used the about 0.5KG of Reactive Resins Syntac EPAFD Epoxy for coating the gunwales on the Goat I am very pleased with the results.   I have tried both the "Fast" and "Rapid" hardeners and they give predictable cure times, easy over-coating and cures to an almost clear finish.  The resin has a low viscosity even at low temperatures that make it easy to coat and probably help it soak into the wood surface.

I am particularly pleased with a complete lack of amine blush that both West or PEC suffer from in perfect conditions yet the Syntac achieves no blush residue in the less than ideal conditions I have been working in.

Below are some pics of the gunwale that has had 3 coats applied, wet on tack.  All it needs is a little flatting down before a varnish is applied for UV protection.


Monday, 6 February 2012

An update on Epoxy

I have spoken on here before about moving from West epoxy to PEC for this project because I became fed up with the amount of amine blush and the cost of West.   Having used PEC quite a bit (3-4KG) for bonding, filleting and coating I am looking again at an alternative.  The PEC epoxy is easy to mix and use but is more viscous than would be ideal, heating the epoxy helps but when working in an unheated workshop on an unheated hull the epoxy soon thickens up.  The biggest issue with PEC (and I have spoken to them about this) is the cure time, it just seems to take ages.  I have tried using it for coating in a heated environment and that works fine but it still takes a much longer than the standard epoxy from West.   When using PEC in the workshop it literally takes days to reach a full cure.  Now if I was after an epoxy with a long working time and I was building during the summer or a in a heated workshop then PEC would be absolutely fine but for me as a home-user in a unheated garage in winter it just doesn’t quite stack up.  Unfortunately PEC don’t make a fast or rapid version of their product but on the positive side their product did not produce amine blush, there was a small amount of blushing but significantly less than West.


So next up on the epoxy test will be Syntac EPAFD from reactive resins, having spoken to them I am going to try their “Rapid” and “Fast” hardeners.   I am hopeful that the Rapid hardener will allow wet-on-tack coating of the Goat at cold temperatures (5-10 Celsius) this will hopefully allow up to three coats in a working day.   I’ll report back on how I get on but so far I have been impressed with the knowledgeable staff and willingness to help.

Saturday, 4 February 2012

More on gunwales, inwales and knees (and other stuff!)

With the inner and outer gunwale in place the knees at the stern and breasthook at the bow have been fitted.  The bresthook is a complicated shape with lots of angles to measure and transpose onto the Doug-fir but it turned out pretty well and I’m pleased I set aside some time for this when I wouldn’t be rushed. 


The long process of planing the gunwales down to size so they match the sheerline of the hull sides followed and I have the blisters to prove it was done by hand.  In some respects I could have used an electric planner (if I owned one) but sometimes the traditional way of doing things is ultimately more satisfying and as long as the plane blades were kept sharp they cut through the Oak, Doug-fir and cedar sandwich that makes up the gunwale.  Once complete I have run the router with a radius cutter around the top of the inner and outer gunwale and then around the inside of all the gunwale gaps (for want of a better name) and this has finished it off nicely.   The only sharp edges left are the bottom edge of the inner and outer gunwale that will both be rounded by hand as the curvature of the hull does will not allow the router to be used.


I really like the pictures below, there is an honesty about this boat as it’s construction is visible to all that want to look.   Yes, it’s never going to be a traditional wooden boat with all the skills required to build it but it is not pretending to be that at all and is lighter, faster and ultimately more usable as a result. 


Having bought some really nice quality stainless steel rowlocks on ebay these have been temporary fitted in position.   When fitting the inner gunwale spacers I had used two slightly longer ones where the rowlocks would be fitted.   The rowlocks have also been raised slightly on an oak pad each side so that the oars are well clear of the gunwale when rowing.  The rowlocks came with a stainless plate and this has been recessed into the top of the oak pad although it’s not my best bit of carpentry, I guess that’s why I’m a “wood butcher”.  The pic below is before the oak pad was recessed.


Finally the top of the middle seat has been roughly cut to size and once glued into position I will use the router and flush trim bit to tidy up the edges.   It is too cold to do any epoxying in the garage at the moment so the seat top has not been fitted, however it has come into the warm of the house and been epoxy coated to save time later.

Saturday, 21 January 2012

Gunwales, inwales and knees

As per the previous posting, I have fitted the drain-tubes into the bottom of the central seat and this has connected the pre-cut limber holes.  The result is not exactly pretty but the tubes will be hidden from view and they would be difficult to fix if they came loose once the top has been fitted to the seat.


As you can see in the picture below I have also fitted the inner-gunwale to both sides and today the oak capping has been glued in place on the starboard side.   The lengths of oak supplied were only about 4m long so I had to scarf them into longer lengths, it is the first time I have done a scarf joint and while not perfect I have put the best side on the outside and it doesn’t look bad at all.  I cut the scarfs by hand using a pull saw but I think if scarfing thin strips of wood again I would use a router and straight guide for greater accuracy.


While the epoxy on the starboard side was starting to cure I decided to have a crack at the stern knees that help to tie the top of the transom into the hull sides.  To some extent I have been putting this off for a time when I wouldn’t be rushed as there are a lot of different angles to cut to get a good fit.  The plans show a simple triangle but I I fancied something a little more curvaceous.   In the end I finished with a pair of good knees that are almost ready to fit, one of which is shown below.  The fit is pretty good and thickened epoxy will fill any small gaps.   I will fit these slightly proud of the hull sides (as with the gunwale and inwale) and then plane or use the belt sander to trim back to size.  I have yet to make the bow knee but that may be a job for tomorrow.

Thursday, 5 January 2012

Happy New Year

Christmas has come and gone and we find ourselves in another new year, I hope it is a healthy, happy and prosperous one for those reading this.   I certainly hope it is a healthy one in this household as it started for me with a serious dose of “turbo man-flu”, I gather it can be terminal but having been struck down since boxing day I am finally (on the 5th Jan) starting to pull myself together.  If you are not familiar with man-flu you need to see this for an explanation http://www.youtube.com/watch?v=VbmbMSrsZVQ


Since the last update the front and rear buoyancy tank tops have been glued in position and a fillet of thickened epoxy run around the edges, it is all starting to look very smart although I have yet to cut the hole for the mast but will probably do this with bearing guided strait router bit so that it is cut back flush to the structure underneath.  I have already run the router along the inside edge of both tanks with a radius cutter to reduce the number of sharp edges to fall against in the boat, the middle seat will get the same treatment when complete.


The side frames for bulkheads for BH2 and BH4 have been trimmed and glued into position.  The side frames for BH2 required a lot of shaping to fit correctly and I was surprised by the vertical curvature (if that is the correct way of describing it) in the plywood hull side.  The tops of the side frames have all been trimmed back so that they are the same size at the inwale spacers so the inwale is probably next to go on.


BH2.2, that is the new one I have added to be the front of the middle seat has had some WRC framing added before being epoxy coated wet-on-tack.  Finally these have been glued into position in hull.   Next steps will be to fit the draining tubes and then I think I need to buy another sheep of Plywood to make and fit the seat top, annoyingly I would probably have enough spare if I had been a bit more cunning in my marking and cutting out of all the various pieces.


On a final note I have bought some really lovely stainless steel rowlocks on ebay because I just couldn’t face putting cheapo plastic rowlocks on the boat after the work put in. 

Tuesday, 20 December 2011

Tank tops, rudder case and the middle seat.

Using up annual leave from work allowed me to have a long weekend so there was an opportunity to get out into the (very cold) garage for a bit of GIS building.


All the inwale spacers are now glued in place and I could now complete the inner and outer gunwale but will hold off until the rest of the inside is complete.  The seat/tank tops for the bow and stern have been cut to shape.   The stern seat top was easy but the bow took a lot of shaping to be a good fit.   I ended up using some scrap plywood to make a template for each side of the tank top (following the curve of the hull) before transposing this shape onto the more expensive okoume marine ply.   Both tank tops now have an epoxy coating so are ready to fit.  Here is a young skipper checking out the toy-storage in the bow


Before the aft tank can be sealed down I need to add a wooden pad to the inside of the transom for the rudder fixings to screw into, to know where this should be located I needed a rudder stock to offer up so this was the next job.   The parts had been pre-cut some time ago and then put to one side as I was waiting to order the Seasure Pintle/gudgeon sets and some other stainless fittings.   The finished tiller and rudderstock is shown below after epoxy coating.


I am changing the design a little in regard to the middle seat, the plans show a single bulkhead and simple seat with open storage below.   I am going to enlarge this seat and make it enclosed for two reasons, this will reduce the amount of water in the boat after a capsize and provide some additional storage if required.   It will also allow me to add some weight to the boat in the middle if I wish as there may be circumstances when I want to make the Goat more docile to sail and adding weight will help if I am sailing on my own.   The middle seat it being extended forward so that it is approx. 500mm wide and this will allow me to fit up to 36litres of water ballast (24 x 1.5L water bottles = 36KG).  Enclosing the middle seat causes a problem though, after a capsize both the forward and main part of the hull will need to be bailed (with a bucket most likely) so I am adding some drain holes, joined by a tube, so that as the Goat is bailed any water in the front part of the boat will (should!) run aft.  The pic below shows the half-bulkheads cut out and in place but they have not been fixed yet.   The drain tube is it literally that, a domestic waste water tube that is cut in half and will be bonded in place.


Wednesday, 14 December 2011

Gunwale and Inwale

Lack of time and the cold weather have slowed progress but I have managed to shape and fit the first part of the outer gunwale that is doug-fir, as you can see in the pic I have also started fitting the inwale spacers that are cedar.  The gunwale will be finished with a thin piece of American white oak so it should be resistant to the inevitable knocks and scrapes.

Wednesday, 16 November 2011

I have not had so much time on the GIS build in the last couple of weeks but have managed to fit the supporting structure for the front and rear seat tops and also fit the mast step as shown in the pics below.  I need to mark out and cut the seat tops soon but fitting these will be my last chance to fix any twist in the hull so I will need to do some careful measuring and adjustment before gluing in place.  Last time I checked it was all looking very straight and true so fingers crossed this is still the case.

I have also fitted the daggerboard case that was built some time ago.   In order to fit this flush to BH3 I needed to cut out a section of the top framing on the forward side of BH3.   It doesn’t say anything about this in the instructions so I just made a guess that this is what was needed.   

Monday, 7 November 2011

Mast and seat supports

Before the seat/tank tops can go in they need to seat cleats fitted to the side of the hull so I have put these in over the weekend along with some of the supporting structure that is fitted on the centreline of the boat in the tanks.  In the pic below you can see the side cleats being held in place with a mixture of clamps and bits of scrap wood.  A start has been made on the outer gunwale as this needs shaping to the correct profile before fitting, I have dry clamped in place and hoping that the wood will relax into shape as this will make final fitting easier.   


I have also made the mast step and partner from Doug Fir, the partner is fitted in place while the step has been shaped to fit and epoxy coated.  It is critical to get this all fitted in the correct position on the centre-line or the Goat will be sailing faster on one tack than the other.


Finally I did a bit of shaping on the tiller, I made this some time ago but while the router was out I ran around the edges and tidied up some of the glue before it was epoxy coated. 


This weekend was the first chance I have had to use the PEC epoxy having made the change from West.   I have found that it is a little thicker that West but responds well to some gentle warming and this makes it considerably less viscous.   Working time is much longer, this is both good and bad so I will contact PEC to see if there is a faster version of the hardener component.  Once set there was a little blushing on the surface by much less than the West, this is a little disappointing as I was hoping to move to a blush-free epoxy as much as possible.  So I may not have solved the blushing problem but at least it is a good bit cheaper than West so I can live with that for now.

Monday, 31 October 2011

Looking goat shaped

The bottom of the hull has been epoxied in place and then tripped to size.   A radius has been planed and sanded to the chine between hull sides and bottom and a layer of glass tape epoxied in place, not the neatest glassing job I have done but it will be cleaned up and painted over so not the end of the world.   I also used up the last of the West epoxy on the bottom and am not going to move to another brand that (hopefully) doesn’t suffer the extensive amine blush that West seems to leave behind after curing.

The pic blow shows the hull now turned the correct way up and I plan to finish the inside seating, structure and in/outwales before flipping back over to finish the bottom.  It’s all looking rather boat shaped.


Wednesday, 12 October 2011

The goat goes 3D

It has been almost a month since updating this, partly down to work and partly down to not doing much building.  However there has been some progress over the past few weeks as follows.

The daggerboard case had been completed, the front and back of the slot have been lined with thick rubber to protect the daggerboard from damage after the inevitable groundings.  With the case sealed up the outside has had three coats of epoxy to match the rest of the hull.

The inner gunwales on the Goat are set on blocks of wood that not only create a stiffer structure but also allow water to drain out easily when the hull is flipped over.  While they won’t be fitted for a while I have made up all the little blocks from Cedar, rounded the ends to make them look nice and epoxied the end grain.  Two of the blocks are a little larger and will be fitted 300mm aft of the seat to accommodate the rowlocks.

Lastly, the Goat had finally gone 3D.  The hull was dry-fitted together initially to make sure it all looks good and fair.  The chinelogs needed trimming where they come together at the bow but this appears to be a common fix that is needed to stop the ply pulling itself apart.  Next was the messy and sticky job of gluing it all together, this was started at the stem and I worked aft pulling out and then refitting each bulkhead in turn finishing at the transom.  When completed the hull sides had a nice fair curve and having taken some measurements it was all strait and square – Amazing!

Lastly I have added a small piece of oak to the outer stem as this area is likely to suffer knocks and the oak will take far more abuse that the Plywood and cedar stem.  Not it’s fitted I’m tempted to leave the oak stem on show as it will match the oak trim on the outer gunwales. 

Monday, 5 September 2011

More Epoxy coating this weekend but no new names for the Goat

Both hull sides have now had to coats of epoxy to their internal sides, both sides of the bulkheads have also been given two coats.   I now need to wash off any residue and give them all a sand before a final coat of epoxy is applied to give a good finish.


In other news I have bought a new (previously-loved) and bigger trailer.  The existing dinghy trailer is small and unsuitable for the Goat so will soon be on ebay, the new trailer was a great find online and I am in the process of adding some new hull supports so that it will suit my use.  The trailer is rated for up to 500KG to is more than man-enough for either the Goat or the Pup.


The daggerboard case can now be finished as I have bought some rubber that will be fitted to the front and back of the case to protect the daggerboard from the inevitable groundings.  I’ll post some pics next time.

Tuesday, 30 August 2011

Epoxy coating and names

Following the advice of other Goat builders I am epoxy coating as much as possible before the boat goes 3D as it is much easier on the flat.   I have found that I get the best finish when I apply 2 coats of epoxy wet-on-tack then leave to fully cure, the surface is then washed to remove the amine blush, abraded to a flat surface and then a third and final epoxy coat applied.   This gives a really tough and attractive finish.   I have tried applying three coats on wet-on-tack but the finish always end up being a little rough so although my method is a lot more work it gives a much better finish.  The final epoxy coat will still need abrading before it gets a protective coating of varnish or paint but at least I know the wood is fully encapsulated so it won’t absorb any water.


So far I have applied the first two coats to epoxy to one side of all the bulkheads, the dagger board case and one hull side.   Unfortunately there is only so much room to lay out all the pieces for coating so it is going to be done bit by bit.  Because I am mixing up some larger quantities of epoxy there is a chance that this could heat up in the pot really fast and set before it is used so the tip I learned was to pour the epoxy on the wood before spreading it out quickly with a plastic squeegee or spreader. The epoxy can then be tipped off with a foam roller or brush that leave as an even coating.


The mast was epoxy and glass coated when it was built some months ago but I was never really happy with the finish, I did it on a day when it was warming up and as a result there was some out-gassing of the wood that had left a finish that really is not great and I have been thinking about sanding it all off and recoating ever since.  What had been holding me back is that this is such a waste of time and epoxy but it had been annoying me.  I have now run over it with a sander to clean up the first two coats and I think it will look ok-ish once it had another coat so I think I will leave it as it is for now and get the boat built.  If it continues to annoy I’ll have to take care of it when the boat is built.


My eldest son had been helping me this weekend, he is only 4½ but I’m pleased that he wants to be involved.   We have been discussing names for the boat, I would like a play on the Goat Island Skiff name but he is more interested in Sharks, these are the options we came up with, I’ll let you work out with who came up with each name.


Son of a Goat

Super Shark

Goatee boat

Shark Bite

Goating fast

Sharkey

Goat Afloat

Shark Killer

Vote Goat!


Any suggestions, answers on a post card…..

Sunday, 21 August 2011

Bulkheads, dagger board case and chine logs.

Since my last posting I have manged to snatch a few hours here and there to get some more work done on the goat.  Bulkheads 1 and 4 are now complete apart from fitting a waterproof hatch of some type so that I can get into the buoyancy tank for storage and drying out if necessary.  Below is a pic of the full set, BH1 to Transom (still without a ruder hole or outboard engine cut-out).

The dagger board case has also been cut out and assembled but not finished.  Below you can see the internals of the case having had a couple of coats of epoxy to seal the wood.  I was thinking of adding some glass mat to the inside to add some abrasion resistance but with only 3mm of clearance and final finishing of the dagger board to be done it will be left with just an epoxy coating.  The aft and possibly the front end of the case will have a tough rubbery foam applied so that the dagger board has some degree of protection when we touch the bottom (at speed).

Lastly, the chine logs have been cut down to size and temporally held in position using a few screws to check that the cedar takes the curve with no problems, as it turns out I need not have worried as it is flexible stuff.  A few builders have suggested trimming the inner-top corner of the chine log to lose the sharp edge and remove a potential dirt and water trap, both of which are good reasons to get the router out.  As you can see below the chine logs have a pleasing bevel and I'll hopefully get these glued up this week.


Monday, 1 August 2011

Bulkheads, transom and hull sides.

A great weekend of GIS build progress, it was a shame to waste some excellent sailing weather working on the goat but very satisfying to make excellent progress.  She is such a simple boat to build I’m sure that anyone with the space could knock one together so top marks to Mr Storer for the design.  The hull sides have been cut out, trimmed to shape and joined.


BH2, BH3 and the transom have also been cut out and their framing fitted. BH2 still needs it’s access hole cut as does BH3, however BH3 may stay solid with an additional bulkhead fitted under the seat to make a water-tight compartment for stowage and reducing the amount of water the the boat after a capsize.


Lastly I have also made the stem piece, the instructions were somewhat minimal ("make stem piece") but all the info was available in the diagram and it is good for builders to have to work these things out rather than being spoon-fed instructions.   I wondered about how to make the required shape for a while  as the width changes from top to bottom then attacked the chunk of cedar with a plane to get the required width and then a Surform that made really quick work of shaping.  The Surform made material removal both quick and easy but was surprisingly accurate.   I shaped the stem of the rocking boat using a surform and it really worked well.  Pic below of the stem piece part way through shaping.